
")


Instagram Reels are the quickest way to viral growth on Instagram right now. One of the hardest parts of creating great Instagram Reels is learning how to edit them. If you’re not using the right tools it can be an overwhelming and time-consuming process. This is why the all-in-one video editor, InShot, has become my time-saving secret weapon! InShot is a simple and intuitive editing app and it is the fastest way to edit your Instagram Reels. It features hundreds of powerful editing tools like custom stickers, voice-over capability, and color correction that allow its users to tap into their creative side! Learning how to use InShot to edit videos quickly and beautifully will be game-changing for your business. You can thank me later!
Instagram Reels: What Are They? And Why Do They Matter?
In July of 2020, Instagram released the Reels feature in response to TikTok: a popular video-sharing app that was skyrocketing into popularity. Reels are fun and engaging short-form videos known to be favored by the algorithms and – unlike Instagram Stories – they don’t disappear after 24 hours. This means they have a high chance of being seen by your current Instagram followers and, because they are also heavily featured on the Explore page, they can help your account to be discovered by new audiences. Creators can even make money by posting Reels! To learn how to get paid by Instagram for your content check out the Reel I created here.
Editing Instagram Reels Tutorial Using InShot (Step by Step)
To begin to edit your video, you’ll first need to hop onto the app store and download InShot. The app icon looks like this.

It’s free! (You can choose to upgrade to a subscription version with bonus features inside the app later if you want to.)
Once it’s downloaded, open the app, click on the video button, and choose which video you want to edit. So easy!
Now that you have the app let’s go over the 5 most important features to help you edit your Instagram Reels. Let’s dive in!
How to Use the Sizing Feature and Why It Matters on Instagram
First up is the Canvas button! Clicking the Canvas button allows you to edit the Ratio, Zoom, and Background. Choosing your ratio size may seem like a simple decision, but it’s actually very important you make sure your videos fall within Instagram’s guidelines. If they don’t you’ll risk them being cropped to fit the app’s supported ratio and part of your video could be lost. Plus setting the correct format will also create a better experience for your viewers. I’ve listed each posting styles’ preferred dimensions below.
1:1 – Square Videos (these can be for a post or in a carousel)
9:16 – Instagram Reels and Stories
16:9 or 9:16 – Instagram TV (Replaced IGTV)
Next up is the background feature. The app allows you to blur, color, or even add patterns to the background of a zoomed-out video. This can be helpful when creating tutorials or when you have a video that doesn’t quite fit into the correct posting ratio.
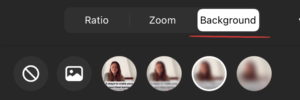
While exploring InShots sizing also be sure to check out the crop, rotate, and flip buttons. These will help ensure everything important fits in the frame and your shots look straight.
Adding Music and Audio Effects to Reels
Audio has the power to make or break a video! A bad video can be saved with great audio, but a great video can be destroyed with bad audio. It’s so important! InShot allows you to control the volume of each clip, add music, and even record voiceovers.
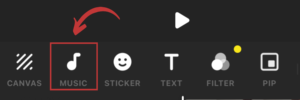
To insert music into your video you must first click the Music button and then choose Tracks. Inside the Tracks folder, you’ll be able to add InShot’s stock music, search iTunes, or upload your own song. There are also several pre-recorded sound effects you can insert like crowds applauding and birds chirping.

The audio effect I use the most often is voiceovers. It is definitely the fastest way I have found to record and edit audio into an Instagram Reel. To use the voiceover feature, click on the music note icon labeled Music and then press the Record icon. You’ll see a 3-second countdown before you are able to record what you want to say. After recording you can choose to adjust the volume of the voiceover, duplicate it, fade it in and out, or delete it and try again! This is a great tool for editing tutorials, telling stories, and creating funny Reels.
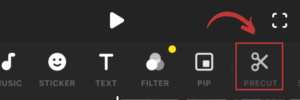
Perfectly Time Your Reels With The Precut Tool
A pretty simple, but extremely useful feature in InShot is the Precut button. Select it and you’ll be able to trim, cut, or split any video clip. This is absolutely essential when you’re editing multiple clips together or creating a montage. It’s also perfect for shaving off the quiet beginnings and ends of videos and to cut out any misspoken ums and likes.
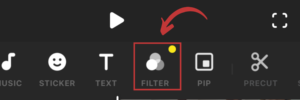
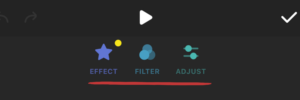
Color Grading and Unique Instagram Filters
Yes, Instagram is famous for its filters, but InShot can do something Instagram can’t, it can control video color correction! InShot lets you adjust your brightness, contrast, warmth, grain, saturation, sharpness, and all of the rest of your favorite editing tools. You will love this for brightening up a dark room or cooling down those overly warm and yellow scenes. You can access this feature by clicking the Filter button followed by the Adjust button. The Filter button also has several beautiful and free filters that you can add by tapping the Filter button a second time, choosing your favorite, and adjusting the strength to your liking. The filter BRIGHT is my favorite. Tag me on Instagram if you use it to edit your Reels! @iammichellegifford.
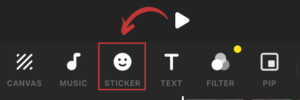
How to Use the Stickers Feature to Add Photos
My last InShot video editing trick for you is to take advantage of the Sticker feature. Click that cute little smiley face and you’ll be able to add fun icons, gifs, and even photos from your camera roll. You can choose when each sticker pops up and how long it stays on the video. It’s seriously a must-have tool for creating quick and easy tutorials!
After you’ve edited your video all that’s left to do is export it! Click the little box with the up arrow in the top right corner, pick your settings, and save it. You will then be able to find it in your camera roll where you can upload it to your Instagram, write a caption, and post!
BONUS TIP – You can easily add text using the InShot app, but I suggest you do it on Instagram once you’ve uploaded it to the Reel editor. Instagram wants us to hang out as long as we can in the app this is an easy way to spend a little more time on it. If you’re not sure how to do that you can check out my quick tutorial below!
InShot is a great tool not only to edit your Instagram videos, but also for creating TikToks, YouTube videos, and Facebook ads. It is the fastest way to edit your Instagram Reels and has saved me from hours of editing!
Now that you know how to edit your Instagram Reels using InShot you just need to decide what to post. Be sure to check out my 4-step formula for creating a powerful content strategy for more help. If you watched my video or found this blog helpful, follow me on Instagram @iammichellegifford. I post tips just like these for creators and small business owners. If you’re building a business that you want to last and need help to succeed online, I can help you get there!


")


You said...